
One of the objectives that a professional teacher has to achieve is to ensure that the subject matter being taught to a classroom of students is sufficiently discussed and understood. Preparation before any class session is necessary so that teachers will be well equipped to handle the topics being presented. This is where the lesson plan comes in handy since this acts as a useful guide for teachers on how they intend to discuss a particular topic for any given school day.
If you’re a teacher needing help with creating effective lesson plans, then here are some Sample Objectives for you to follow.
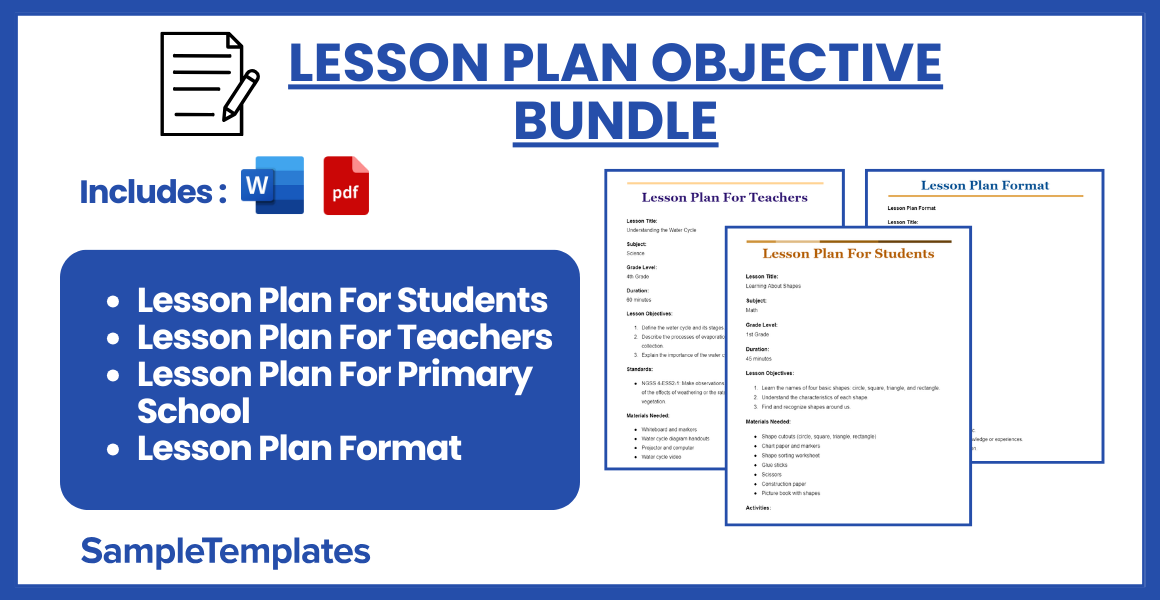
Download Lesson Plan Objective Bundle
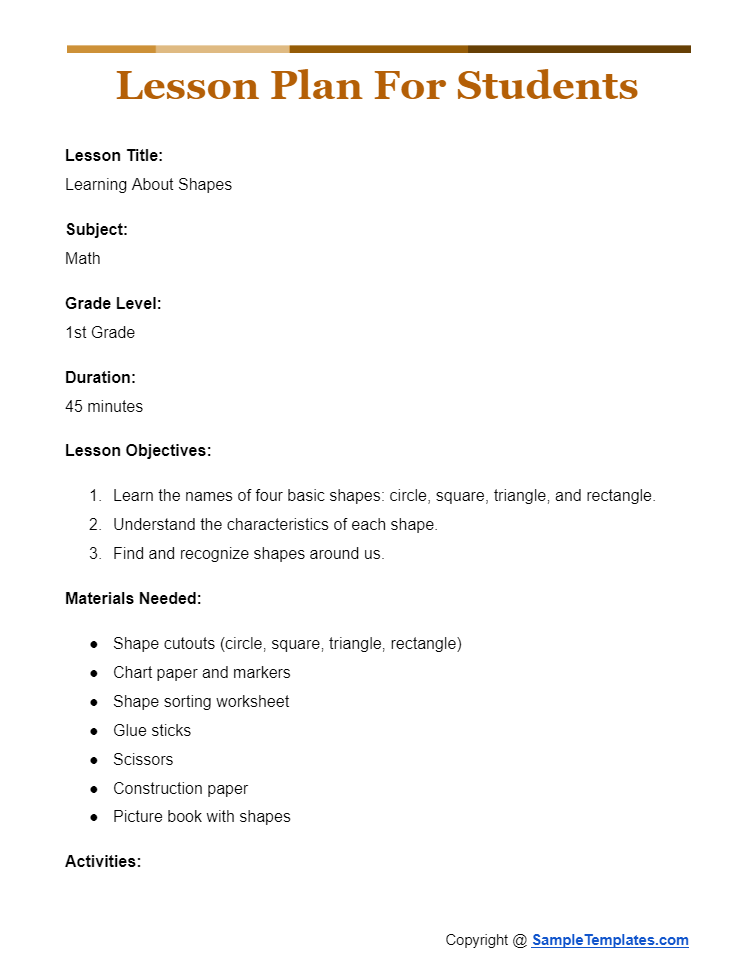
Lesson Plan For Students
Lesson Title:
Learning About Shapes
Subject:
Math
Grade Level:
1st Grade
Duration:
45 minutes
Lesson Objectives:
- Learn the names of four basic shapes: circle, square, triangle, and rectangle.
- Understand the characteristics of each shape.
- Find and recognize shapes around us.
Materials Needed:
- Shape cutouts (circle, square, triangle, rectangle)
- Chart paper and markers
- Shape sorting worksheet
- Glue sticks
- Scissors
- Construction paper
- Picture book with shapes
Activities:
- Introduction (10 minutes):
- Story Time: Start with reading a fun picture book that talks about shapes.
- Discussion: Ask, “Can you name any shapes you see around us?”
- Learning Time (10 minutes):
- Shape Drawing: Draw each shape on chart paper and say its name out loud.
- Circle: “A circle is round with no corners.”
- Square: “A square has 4 equal sides and 4 corners.”
- Triangle: “A triangle has 3 sides and 3 corners.”
- Rectangle: “A rectangle has 4 sides, with opposite sides being equal.”
- Shape Drawing: Draw each shape on chart paper and say its name out loud.
- Activity Time (10 minutes):
- Shape Match: Give each student shape cutouts.
- Game: Call out a shape and let students hold up the matching cutout.
- Tracing Shapes: Let’s all trace shapes with our fingers in the air.
- Craft Time (10 minutes):
- Worksheet Fun: Give out worksheets with different shapes.
- Cut and Paste: Cut out shapes and glue them in the correct place on the worksheet.
- Review (5 minutes):
- Show and Tell: Ask a few students to name a shape and tell one thing about it.
- Quick Quiz: Hold up a shape and let students shout out its name.
- Wrap Up (5 minutes):
- Summary: Review all the shapes we learned today.
- Shape Hunt: Play “I Spy” and find shapes in the classroom.
- Home Challenge: Ask students to find shapes at home and share them next time.
Fun Extra Activities:
- Shape Art: Create a picture using different shapes.
- Shape Song: Sing a song about shapes.
Reflection:
- Think about what you enjoyed learning today.
- Share with a friend one new thing you learned about shapes.
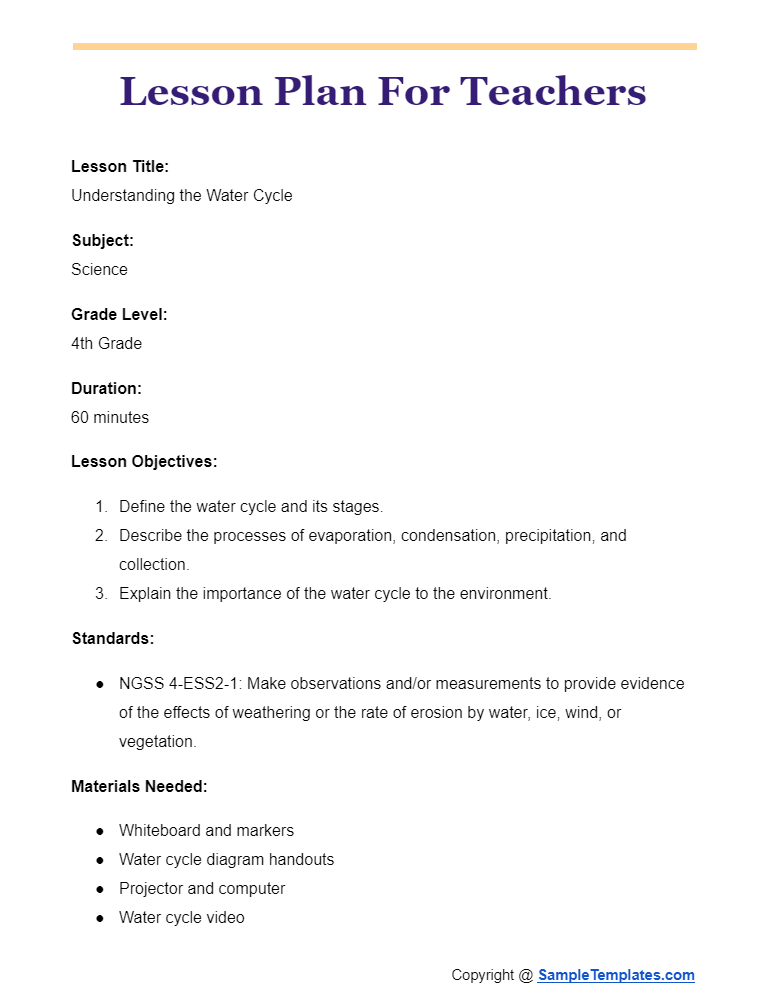
Lesson Plan For Teachers
Lesson Title:
Understanding the Water Cycle
Subject:
Science
Grade Level:
4th Grade
Duration:
60 minutes
Lesson Objectives:
- Define the water cycle and its stages.
- Describe the processes of evaporation, condensation, precipitation, and collection.
- Explain the importance of the water cycle to the environment.
Standards:
- NGSS 4-ESS2-1: Make observations and/or measurements to provide evidence of the effects of weathering or the rate of erosion by water, ice, wind, or vegetation.
Materials Needed:
- Whiteboard and markers
- Water cycle diagram handouts
- Projector and computer
- Water cycle video
- Glass jar, hot water, ice cubes, and a plate for demonstration
- Worksheets for assessment
Introduction: (10 minutes)
- Begin with a question: “Where do you think rain comes from?”
- Discuss students’ prior knowledge about water and weather.
- Introduce the lesson by explaining that they will learn about the journey of water through the water cycle.
Direct Instruction: (15 minutes)
- Use the whiteboard to draw and explain the stages of the water cycle: evaporation, condensation, precipitation, and collection.
- Show a water cycle diagram on the projector and explain each part in detail.
- Play a short educational video that illustrates the water cycle.
Guided Practice: (15 minutes)
- Conduct a hands-on demonstration of the water cycle:
- Fill a glass jar with hot water (to represent the earth).
- Place a plate on top of the jar with ice cubes on it (to represent the atmosphere).
- Observe how the water vapor condenses on the plate and drips down (like precipitation).
- Engage students with questions about what they observe and how it relates to the water cycle stages.
Independent Practice: (10 minutes)
- Distribute water cycle diagram handouts and have students label the stages.
- Provide a worksheet with questions about the water cycle for students to complete individually.
Assessment: (5 minutes)
- Collect and review the labeled diagrams and worksheets to assess understanding.
- Ask a few students to explain one stage of the water cycle in their own words.
Closure: (5 minutes)
- Summarize the key points of the lesson, highlighting the importance of the water cycle.
- Connect the lesson to real-life examples, such as rain, rivers, and lakes.
- Provide an opportunity for students to ask questions and share any final thoughts.
Differentiation:
- Provide visual aids and simplified diagrams for students who need additional support.
- Offer more challenging extension activities, such as researching the impact of the water cycle on different climates, for advanced learners.
- Pair students for the independent practice to encourage peer support.
Reflection:
- Reflect on student engagement and understanding during the lesson.
- Note any difficulties students had with particular concepts or activities.
- Consider adjustments for future lessons based on student feedback and assessment results.
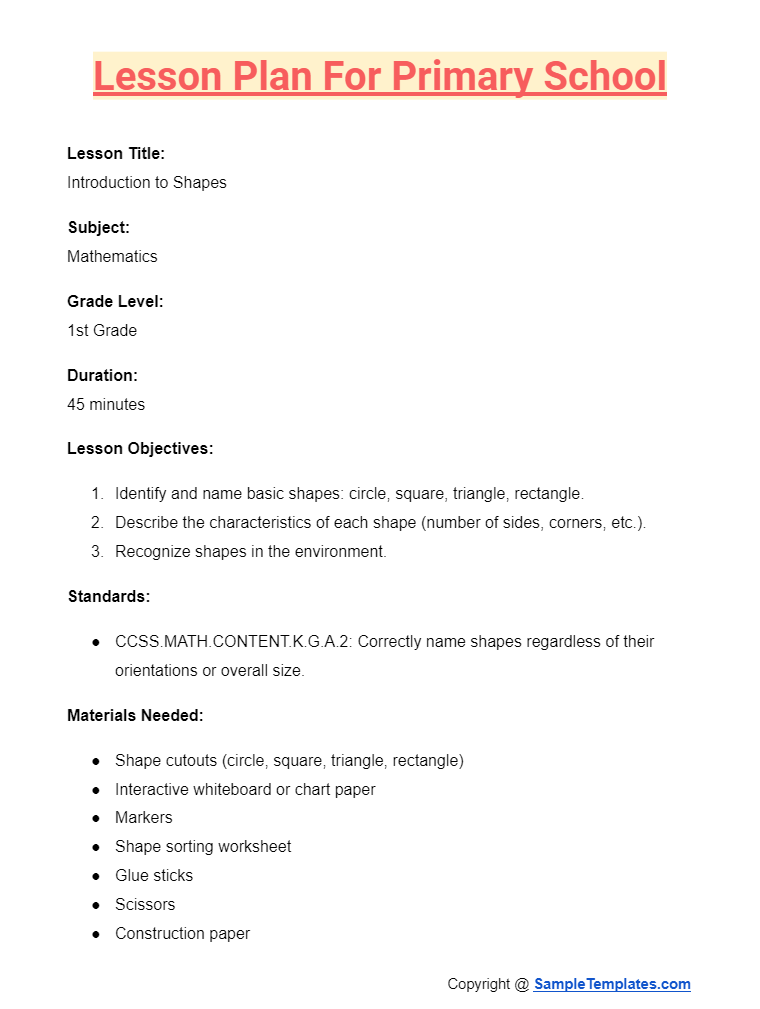
Lesson Plan For Primary School
Lesson Title:
Introduction to Shapes
Subject:
Mathematics
Grade Level:
1st Grade
Duration:
45 minutes
Lesson Objectives:
- Identify and name basic shapes: circle, square, triangle, rectangle.
- Describe the characteristics of each shape (number of sides, corners, etc.).
- Recognize shapes in the environment.
Standards:
- CCSS.MATH.CONTENT.K.G.A.2: Correctly name shapes regardless of their orientations or overall size.
Materials Needed:
- Shape cutouts (circle, square, triangle, rectangle)
- Interactive whiteboard or chart paper
- Markers
- Shape sorting worksheet
- Glue sticks
- Scissors
- Construction paper
- Picture book featuring shapes
Introduction: (10 minutes)
- Begin with a friendly greeting and a fun question: “Can anyone tell me what shapes they see in the classroom?”
- Read a picture book that features different shapes to capture students’ interest.
- Briefly introduce the lesson objectives, explaining that they will learn about shapes and how to find them around us.
Direct Instruction: (10 minutes)
- Use the interactive whiteboard or chart paper to draw each shape (circle, square, triangle, rectangle).
- Describe the characteristics of each shape:
- Circle: no sides, no corners.
- Square: 4 equal sides, 4 corners.
- Triangle: 3 sides, 3 corners.
- Rectangle: 4 sides (opposite sides are equal), 4 corners.
- Show real-life examples of each shape (e.g., clock for circle, book for rectangle).
Guided Practice: (10 minutes)
- Hand out shape cutouts to students.
- Call out a shape and ask students to hold up the correct cutout.
- Have students trace each shape with their finger in the air as you describe it again.
Independent Practice: (10 minutes)
- Provide a shape sorting worksheet where students cut out various shapes and glue them under the correct category (circle, square, triangle, rectangle).
- Walk around the classroom to assist students as needed.
Assessment: (5 minutes)
- Review the shape sorting worksheets to check for understanding.
- Ask a few students to name a shape and describe its characteristics.
Closure: (5 minutes)
- Summarize the key points of the lesson by revisiting the shapes on the whiteboard.
- Play a quick “I Spy” game where students find shapes around the classroom.
- Encourage students to look for shapes at home and share with the class the next day.
Differentiation:
- Provide additional support for students who need it by offering shape templates for tracing.
- Offer advanced students a challenge to find more complex shapes like ovals and hexagons.
- Use tactile materials like shape blocks for students who benefit from hands-on learning.
Reflection:
- Reflect on student engagement and understanding during the lesson.
- Note any difficulties students had with identifying or describing shapes.
- Consider adjustments for future lessons based on student feedback and assessment results.
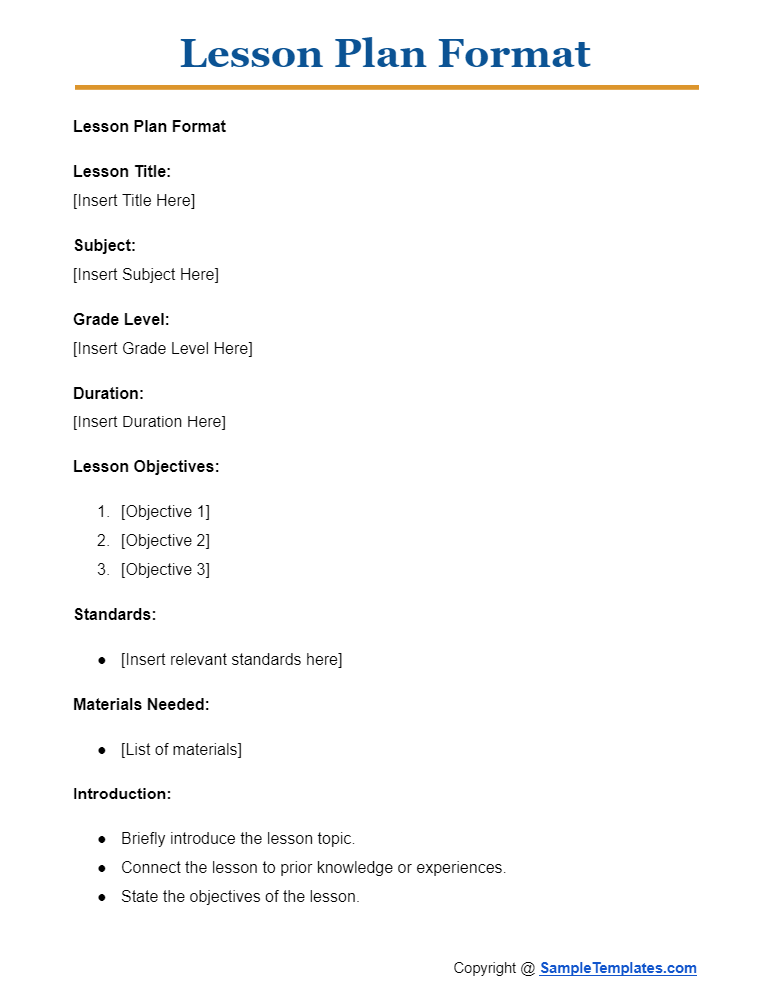
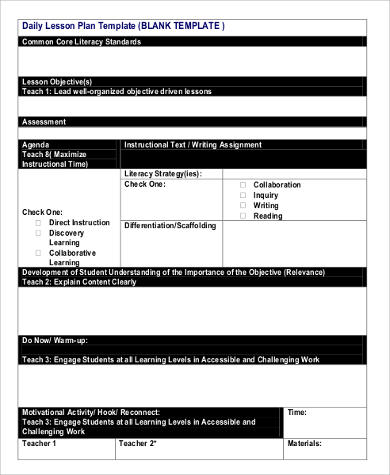
Lesson Plan Format
Lesson Plan Format
Lesson Title:
[Insert Title Here]
Subject:
[Insert Subject Here]
Grade Level:
[Insert Grade Level Here]
Duration:
[Insert Duration Here]
Lesson Objectives:
- [Objective 1]
- [Objective 2]
- [Objective 3]
Standards:
- [Insert relevant standards here]
Materials Needed:
- [List of materials]
Introduction:
- Briefly introduce the lesson topic.
- Connect the lesson to prior knowledge or experiences.
- State the objectives of the lesson.
Direct Instruction:
- Explain key concepts and ideas.
- Use visual aids, examples, and demonstrations.
- Engage students with questions and discussions.
Guided Practice:
- Provide activities where students can practice new skills with support.
- Monitor and provide feedback.
Independent Practice:
- Assign tasks that students can complete independently.
- Ensure these tasks reinforce the lesson objectives.
Assessment:
- Describe how you will assess student understanding (e.g., quizzes, observations, assignments).
- Include any rubrics or criteria for evaluation.
Closure:
- Summarize key points of the lesson.
- Connect the lesson to future learning.
- Provide opportunities for students to ask questions.
Differentiation:
- Detail strategies to accommodate diverse learners (e.g., advanced students, students with special needs).
- Include different methods of engagement, representation, and expression.
Reflection:
- Reflect on what went well and what could be improved.
- Consider student feedback and assessment results.
Browse More Templates On Lesson Plan Objective
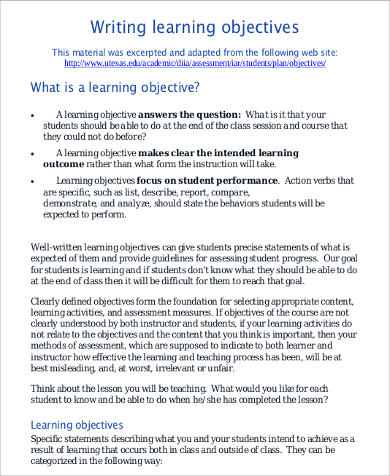
Writing Lesson Plan Objectives
Smart Lesson Plan Objectives Sample
How to Create a Lesson Plan?
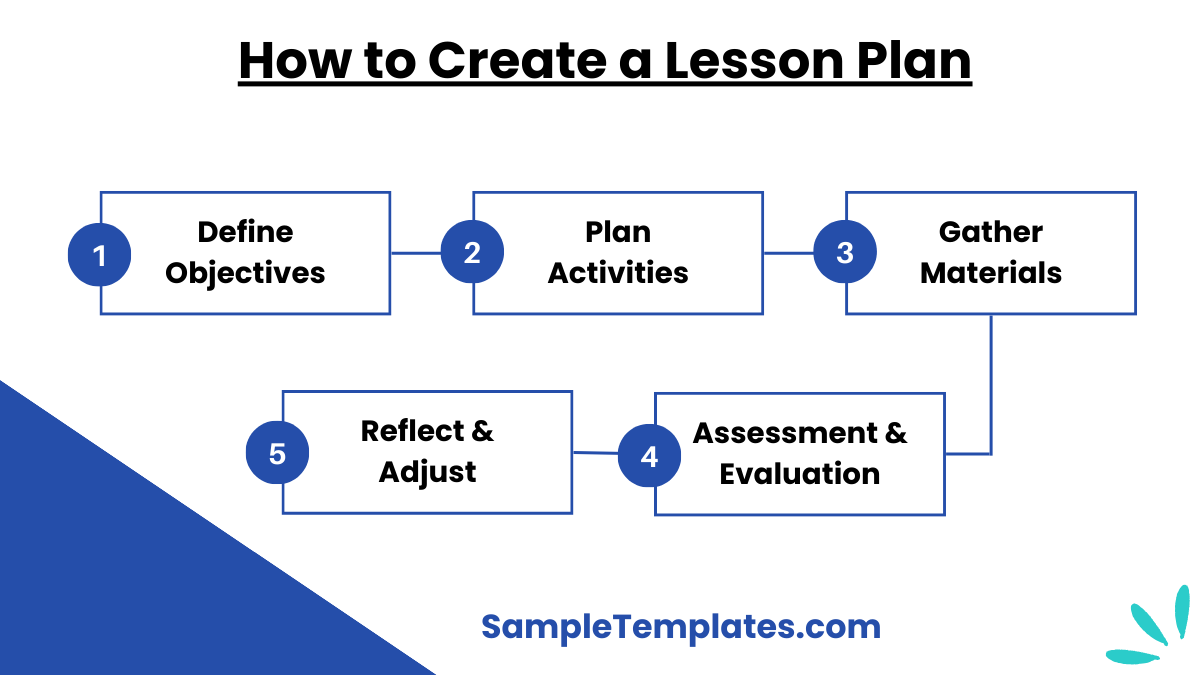
- Define Objectives:
- Clearly state what you want students to learn by the end of the lesson. These should be specific, measurable, attainable, relevant, and time-bound (SMART).
- Plan Activities:
- Outline the instructional activities you will use to achieve the lesson objectives. This includes direct instruction, guided practice, independent practice, and any interactive or hands-on activities.
- Gather Materials:
- List all the materials and resources you will need for the lesson, such as handouts, visual aids, technology, and supplies for activities. You can also see more on Yearly Lesson Plan.
- Assessment and Evaluation:
- Determine how you will assess students’ understanding and mastery of the lesson objectives. This can include quizzes, worksheets, oral questioning, or practical demonstrations.
- Reflect and Adjust:
- After delivering the lesson, reflect on what worked well and what could be improved. Use this reflection to adjust future lesson plans and better meet the needs of your students. You can also see more on Sample Lesson Plan Format.
Strategies for Effective Lesson Plan Sample in PDF
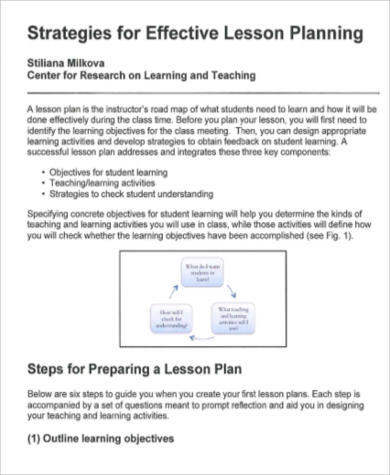
Writing a lesson plan isn’t particularly challenging, especially if you’re someone who is well versed in the subject you’re teaching. The key thing to remember when you’re starting to create one is to write down your main objective for that particular lesson. It helps you get a clear picture of the goals you intend to achieve and keeps your lesson focused on the essentials. Furthermore, having a main objective will allow you to break it down further by writing secondary objectives that will help support your main one.
Another vital element you must consider is writing an outline, which serves as a blueprint to help you deliver the lesson in a comprehensive and organized manner. There is no set standard for creating an outline for your lesson plan, although it does help to write it down in a bulleted or list format to simplify things for you when you glance at your copy during class. This method is considered ideal since there is a tendency for you to get momentarily lost when you write things down in a traditional paragraph form.
To help you understand the Lesson Plan Format basics as well as Curriculum Planning, check out more helpful examples featured below.
Benefits of Lesson Plan
- Organized Instruction:
- Provides a clear roadmap for the teacher, ensuring that the lesson is structured and flows logically.
- Focused Objectives:
- Helps teachers define specific learning goals, ensuring that all activities and assessments are aligned with these objectives.
- Efficient Use of Time:
- Ensures that instructional time is used effectively, covering all necessary content within the allotted time frame. You can also see more on Simple Lesson Plan.
- Enhanced Student Engagement:
- Incorporates varied activities and teaching methods, keeping students interested and engaged throughout the lesson.
- Improved Classroom Management:
- Reduces classroom disruptions by providing a clear plan and keeping students on task.
- Adaptability:
- Allows for adjustments based on student needs and responses, providing flexibility to address different learning paces and styles. You can also see more on Trainer Lesson Plan.
- Assessment and Evaluation:
- Includes built-in assessment strategies, helping teachers gauge student understanding and adjust instruction as needed.
- Professional Growth:
- Encourages reflection and continuous improvement, helping teachers evaluate the effectiveness of their lessons and make necessary adjustments for future instruction.
Lesson plan templates are available in different formats and they can easily be downloaded online. They come as the best help for teachers and instructors. You can also see Sample Daily Lesson Plans.
Lesson Plans and Writing Learning Objectives in PDF
Blank Daily Lesson Plan Objectives
Types of Lesson Plan
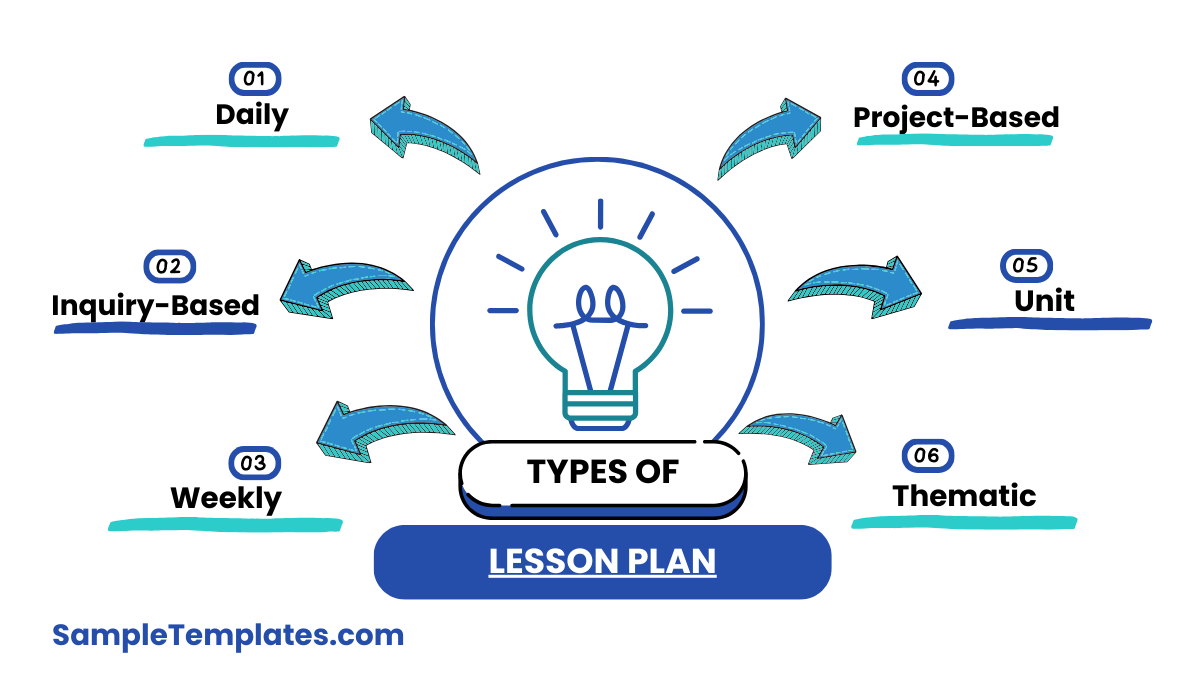
- Daily Lesson Plan:
- A detailed plan for a single day’s lesson, outlining specific activities and objectives for that day.
- Weekly Lesson Plan:
- A plan that outlines the lessons and activities for an entire week, providing a broader view of the curriculum.
- Unit Lesson Plan:
- A sample plan that covers a complete unit of study, usually over several weeks, detailing all lessons, activities, and assessments within that unit.
- Inquiry-Based Lesson Plan:
- A plan that focuses on student inquiry and exploration, encouraging students to ask questions and investigate topics deeply.
- Project-Based Lesson Plan:
- A plan centered around a project that students work on over a period of time, integrating multiple subjects and skills.
- Differentiated Lesson Plan:
- A plan designed to address the diverse needs of students by providing different pathways to learning, including varied activities, materials, and assessments. You can also see more on Elementary Lesson Plan.
- Thematic Lesson Plan:
- A plan that integrates various subjects around a central theme, making connections across disciplines.
- Flipped Classroom Lesson Plan:
- A plan where students first learn new content at home (e.g., through videos or readings) and then engage in hands-on activities and discussions in class to reinforce and apply that knowledge. You can also see more on Blank Lesson Plan.
Example of Lesson Plan Objectives

Another helpful way to create your lesson plan is to design a basic table and fill it with the necessary details relevant to your curriculum. This is highly recommended, especially if you want to save time creating a comprehensive lesson plan that will cover a long period of time such as a full school week or even a whole month. Through this method, you’ll be able to see exactly what you need to do in the coming days, minimizes the risk of procrastinating, and keeps you fully prepared at all times so your students will be able to go through a normal class session without any problems. You can also see more on Academic Lesson Plan.
In addition, placing helpful reminders on your lesson plan such as “print handouts,” “engage students in oral recitation,” “prepare slideshow presentation,” or “distribute test questionnaires” will let you determine the flow of a given class session. Things like these will also give you room for creative Printable Lesson Plans or Healthy Meal Plan ideas that you could use in future classes. Never be afraid to infuse a little creativity since your role is not just to educate young minds, but teach lessons to students in a way that will entertain or inspire them.
What are the three learning objectives?
Knowledge acquisition, skill development, and attitude/behavior change. These guide instruction, ensuring students gain essential information, apply skills effectively, and adopt desired attitudes. You can also see more on Lesson Planner.
How to write a learning objective?
Use clear, specific, and measurable language to define what students will know, do, or value after instruction, aligning with curriculum standards and assessment criteria.
How to start objectives?
Begin with action verbs like “identify,” “analyze,” or “create” to clearly define expected student behaviors, ensuring objectives are measurable and observable. You can also see more on Student Lesson Plan.
How do you begin to develop learning objectives?
Analyze curriculum standards, identify desired outcomes, and use Bloom’s Taxonomy to create specific, measurable, and attainable objectives that guide instruction and assessment.
The lesson plan aimed to engage students in understanding key concepts through interactive activities and assessments. By the end, students demonstrated improved comprehension and application of the material, meeting the lesson’s objectives effectively.
Related Posts
FREE 7+ Sample Career Objective Statement Templates in MS Word | PDF
FREE 9+ General Resume Objective Samples in PDF
FREE 8+ Sample Customer Service Objective Templates in PDF | MS Word
FREE 8+ Sample Good Resume Objective Templates in PDF | MS Word
FREE 7+ Sample Objectives for Resume Templates in PDF | MS Word
FREE 10+ University Equity Statement Samples [ Principles, Educational, Mission ]
FREE 10+ Leadership Report Samples [ Development, Training, Camp ]
FREE 10+ Return to Work Action Plan Samples in PDF | DOC
Bibliography Sample For Project
FREE 10+ One Point Lesson Samples in PDF
FREE 6+ Permit to Work Samples in PDF
FREE 10+ Church Directory Samples in PDF
FREE 10+ Opening Hours Samples in PDF | MS Word
FREE 10+ Periodic Table Samples in PDF | MS Word
FREE 10+ Bid Tabulation Samples in PDF | MS Word